I succeeded with the challenge pretty easily, but discovered I had a problem with the readings I was getting from the light sensor, and this has taken me all weekend to sort out.
The readings were doubling and dropping again every couple of readings (this is on the Raspberry Pi 3), so I tried it on the Raspberry Pi B+ and got stable readings. I retested the Raspberry Pi 3 got the same results, and double checked everything and got the same doubling and dropping.
Checked the internet and could not find this problem, so I posted on a couple of forums. Got offered some suggestions, but was still getting the same results.
So I got a new Raspberry Pi 3 a new official Pi 3 power supply, did a new SD card with Raspbian, got stable results. Checked the new SD card in old Raspberry Pi 3 got stable results, then did more swapping around of cards and checking. Then reinstalled Raspbian onto the old SD card and everything was working fine.
So the only conclusion I can come to is that ever when I first installed, or over time with updates, the old Raspbian had got corrupted.
Now I can move onto the next worksheet.
About Me

- Gothic Card
- Starting my journey into the world of Microcontrollers, electronics and programming, a bit late in life (but your never to old to learn).
Monday, 9 May 2016
Monday, 2 May 2016
Raspberry Pi CamJam EduKit 2 - Sensors - Part 4 Worksheet 4: Light
This worksheet uses an LDR - Light Dependent Resistor and a Capacitor to measure the light and print readings to the screen.

There is a jump wire that connects the Positive of the Capacitor and the LDR (in the diagram it is a yellow wire, which is a bit hard to see).
 | ||
| The actual wiring |
The video shows what happens, when you change the amount of light reaching the LDR.
The CamJam EduKits are really helping me learn Python programming, and using electronics, so pleased I finally bought them.
Now to try the worksheet challenge...
Sunday, 1 May 2016
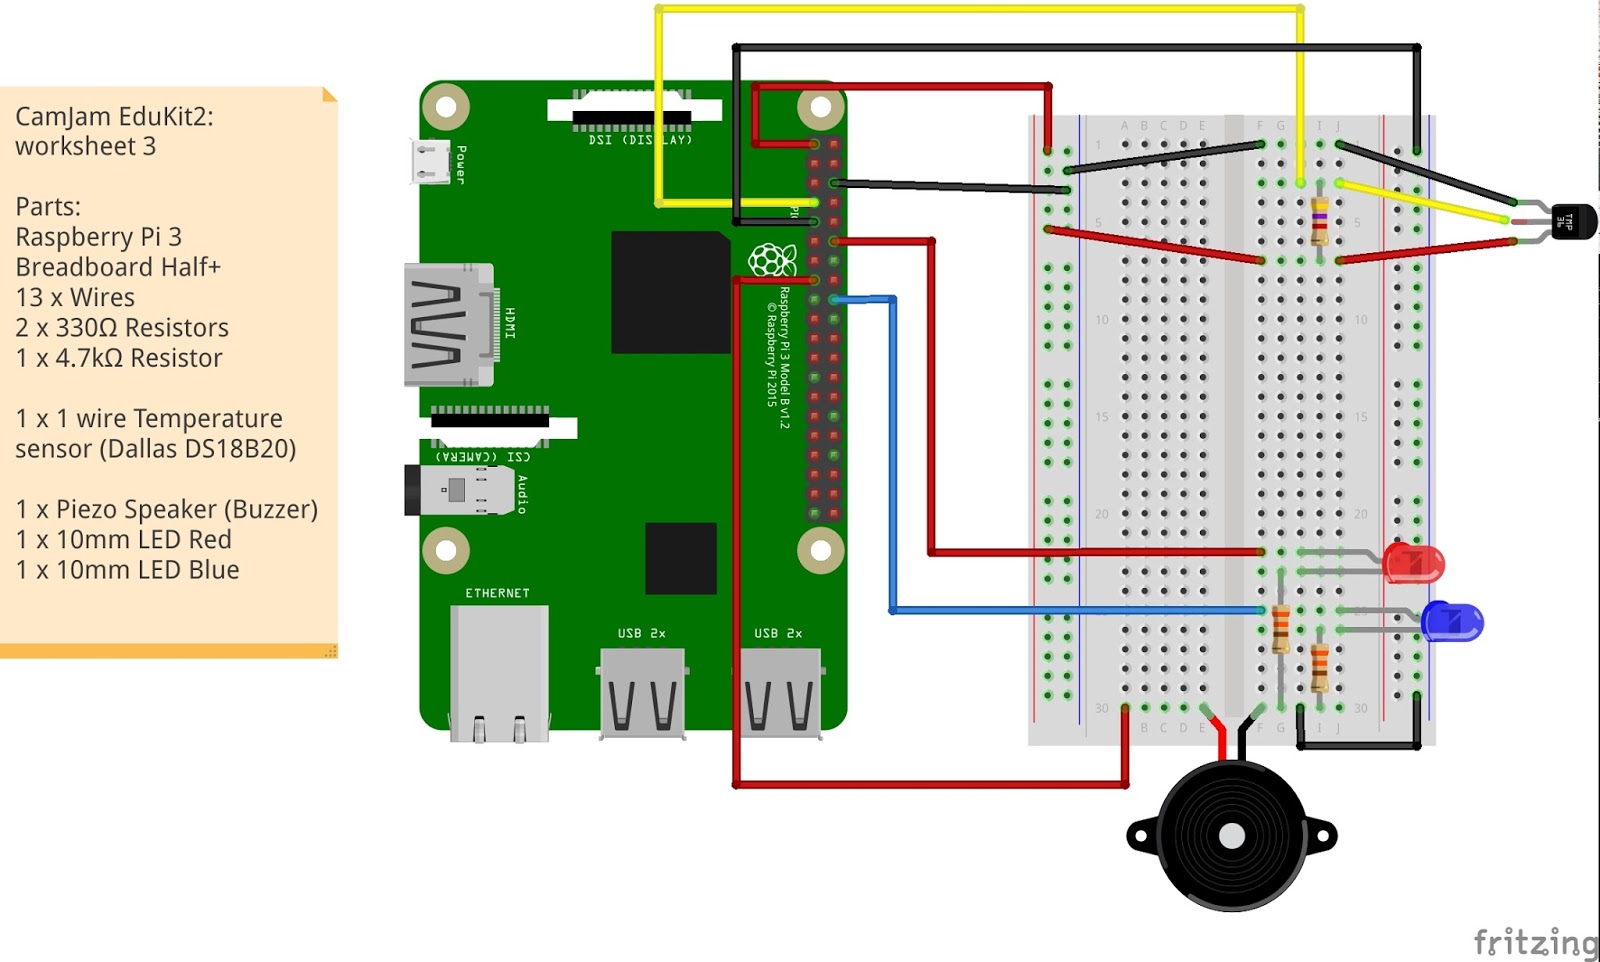
Raspberry Pi CamJam EduKit 2 - Sensors - Part 3 Worksheet 3: Challenge Temperature, Lights, Sound
WORKSHEET 3 CHALLENGE:
To add Lights and Sound at different temperatures
The three temperatures I decided where- Red LED - 22'c and above
- Buzzer - 25'c and above
- Blue LED - 18'c and Below
I'm pleased as this is the first challenge I've succeeded at, so I must be learning something. (Got to lean how to video better). About 50% of the code I added to the Worksheet 3 code, to get the result.
The Code:
#CamJam EduKit 2 - Sensors#Worksheet 3 - Challenge - TemperatureLightsSound
#Import Libraries
import os
import RPi.GPIO as GPIO
import glob
import time
#Initialize the GPIO Pins
os.system('modprobe w1-gpio') #Turns on the GPIO module
os.system('modprobe w1-therm') #Turns on the Temperature module
GPIO.setmode(GPIO.BCM) #Set GPIO Mode
GPIO.setwarnings(False) #Turns of GPIO Warnings?
#Set Variables to store Pin Numbers
LEDRed = 18
LEDBlue = 24
BUZ = 22
#Set GPIO as Output
GPIO.setup(LEDRed, GPIO.OUT)
GPIO.setup(LEDBlue, GPIO.OUT)
GPIO.setup(BUZ, GPIO.OUT)
#Finds the correct device file that holds the temperature data
base_dir = '/sys/bus/w1/devices/'
device_folder = glob.glob(base_dir + '28*')[0]
device_file = device_folder + '/w1_slave'
#A function that reads the sensors data
def read_temp_raw():
f = open(device_file, 'r') #Opens the temperature device file
lines = f.readlines() #Returns the text
f.close()
return lines
#Convert the value of the sensor into a temperature
def read_temp():
lines = read_temp_raw() #Read the temperature 'device file'
#While the first line does not contain 'YES', wait for 0.2s
#and then read the device file again.
while lines[0].strip()[-3:] != 'YES':
time.sleep(0.2)
lines = read_temp_raw()
#Look for the position of the '=' in the second line of the
#device file.
equals_pos = lines[1].find('t=')
#If the '=' is found, convert the rest of the line after the
#'=' into degrees Celsius, then degrees Fahrenheit
if equals_pos != -1:
temp_string = lines[1][equals_pos+2:]
temp_c = float(temp_string) / 1000.0
temp_f = temp_c * 9.0 / 5.0 + 32.0
return temp_c, temp_f
#Checks if the LEDs or Buzzer should be ON/HIGH or OFF/LOW
while True:
temp_c, temp_f = read_temp() # Retuns a TUPLE of 2 Values
#Set GPIO Pins LOW/OFF
GPIO.output(LEDRed, GPIO.LOW)
GPIO.output(LEDBlue, GPIO.LOW)
GPIO.output(BUZ, GPIO.LOW)
#Turns RED LED on if above 22'c
if temp_c > 22.0:
GPIO.output(LEDRed, GPIO.HIGH)
#Turns BLUE LED on if below 18'c
if temp_c < 18.0:
GPIO.output(LEDBlue, GPIO.HIGH)
#Turns BUZZER on if above 25'c
if temp_c > 25.0:
GPIO.output(BUZ, GPIO.HIGH)
#Prints Temperature to screen in Celcius and Fahrenheit
print(read_temp())
#Waits 1 second then returns to read temperature
time.sleep(1)
Raspberry Pi CamJam EduKit 2 - Sensors - Part 2 Worksheet 3: Temperature Sensor
 |
| Wiring Diagram |
 |
| What it actually looks like |
 |
| Confirmation sensor working |
There was beginner issues in getting the programme running correctly, and they were down to getting the indentations right in Python 3.
The programme prints the temperature out on to the screen in Celsius and Fahrenheit.
Subscribe to:
Comments (Atom)